What are templates?
Django templates are text files, which can be composed to run as HTML files - which can later be referred to as HTML templates, once templating has been configured in Django.
Step 1:
Make sure that you have configured template rendering in Django, and that your project directory looks similar to the following:
# - Base/Root directory

MyProject
---> MyProject(contains settings.py)
---> MyApp
---> static
---> templates
---> venv
---> db.sqlite3
---> manage.py
Step 2:
Let's go ahead and create a model called "Task", in models.py.
# - models.py

from django.db import models

class Task(models.Model):

    title = models.CharField(max_length=100, null=True)

    content = models.CharField(max_length=1000, null=True, blank=True)

    date_posted = models.DateTimeField(auto_now_add=True, null=True)
Step 3:
Next we will migrate our model to our default database:
python manage.py makemigrationspython manage.py migrateStep 4:
Next we wont to register our model via admin.py
# - admin.py

from django.contrib import admin
from . models import Task

admin.site.register(Task)
Step 5:
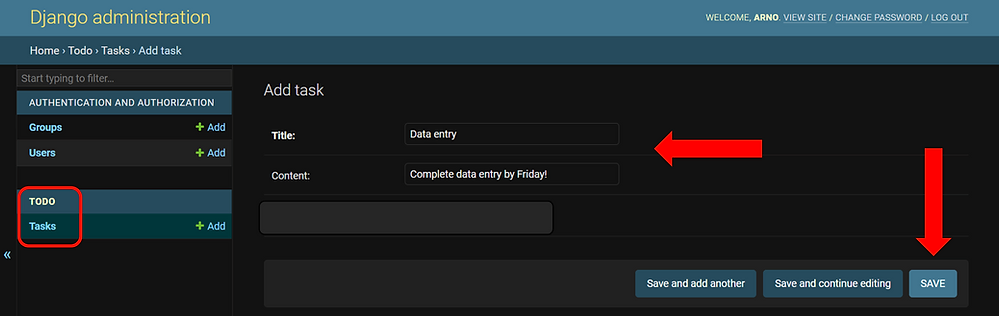
We can now create a simple record/object through our django admin panel:
Step 6:
Next we will create a view. Within this view we will query our database to select all of the records/objects from our task model.
We will then need to assign task within a context dictionary - this is needed in order to render our data to a html template called 'view-tasks.html'
# - views.py

def viewTask(request):

    task = Task.objects.all()

    context = {'task': task}

    return render(request, 'view-tasks.html', context=context)
Step 7:
We need to setup our url path in urls.py.
# - urls.py

from django.urls import path
from . import views

urlpatterns = [

	path('view-tasks', views.viewTask, name="view-tasks"),

]
Step 8:
We must now create our 'view-tasks.html' template, which we must ensure is stored in our templates directory like so:
# - Base/Root directory

MyProject
---> MyProject(contains settings.py)
---> MyApp
---> static
---> templates
    ---> view-tasks.html
---> venv
---> db.sqlite3
---> manage.py
Step 9:
Now, we need to code our 'view-tasks.html' template accordingly.
The data will be rendered via our for loop, which will loop through our key that we defined in our context dictionary ('task').
We must then render our attributes: task.title and task.content.
<!-- view-tasks.html -->

{% load static %}

<html>

    <head>

        <meta charset="utf-8" />

        <meta name="viewport" content="width-device-width, initial-scale=1, maximum-scale=1"/>

        <link rel="stylesheet" type="text/css" href="{% static 'css/styles.css' %}">

        <title> Taskly | View tasks </title>

    </head>

        <h3 class="text-center"> Views tasks </h3>

        <hr>


        {% for tsk in task %}

            <div class="container bg-white shadow-md p-5 form-layout" style="margin-top:20px;">


                <h3> {{ tsk.title }} </h3>

                <br>

                {{ tsk.content }}

                <br> <br>

                <a class="btn btn-info navbar-btn" type="button" href="{% url 'update-task' tsk.id %}">Update task</a>

                <br> <br>


                <a class="btn btn-danger navbar-btn" type="button" href="{% url 'delete-task' tsk.id  %}">Delete task</a>


            </div>

        {% endfor %}


    </div>

        <br>

</html>Python Django: Ultimate Beginners Course
Master Django development from scratch with theory and hands-on examples, building and deploying web applications.
🎓 Course available on Udemy now!